
5m x 3m Canopy Garden Room in Knaresborough, North Yorkshire
Knaresborough, North Yorkshire
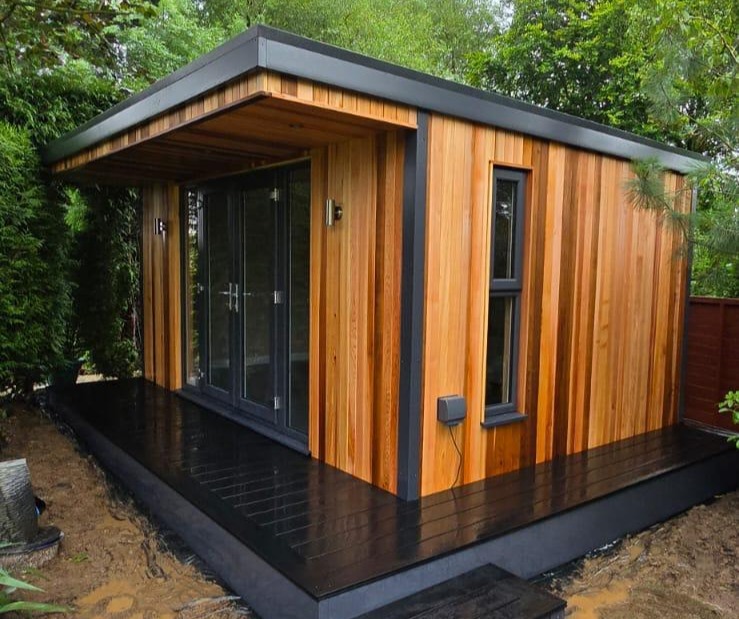
Mature planting surrounds this 5m x 3m canopy garden room in Knaresborough, North Yorkshire, giving it a secluded position within an established garden. Warm vertical timber cladding contrasts with dark roof trims, glazing frames and decking. The front canopy projects over the entrance, and the decking continues around the right-hand side, providing a defined outdoor surface beside both visible elevations.
The building’s appeal comes from how these elements work together. The timber-lined canopy gives the entrance depth, the glazed doors retain an outlook into the garden, and a narrow, tall window introduces daylight through the side wall. Two exterior wall lights frame the front, while a weatherproof electrical fitting is visible beneath the side window.
This installation shows how a room can become part of a planted garden while retaining a clear architectural shape. For homeowners considering garden rooms Knaresborough, it offers ideas for combining warm materials, a sheltered entrance and practical access around the building.
A garden room nestled among mature planting
The garden setting is a defining feature of this project. Dense foliage sits close to the front and sides, with taller trees rising beyond the roof. From the angle shown, the room feels enclosed by greenery while its entrance remains clearly visible.
That creates a particular experience when approaching the building. The dark canopy edge appears against the leaves, then the warmer timber surfaces become more prominent as you get closer. The broad glazed entrance gives the eye a clear destination within the planted setting.
An established garden can provide several possible positions for a room, each with a different outlook and approach. A corner surrounded by shrubs may feel private, while a more open location may receive longer periods of sunlight.
For a similar project, photograph the proposed area from the house and from the position of the new room. Looking in both directions helps identify the planting you want to retain and the view you would enjoy from inside.
A canopy with a clearly visible projection
The deep projecting canopy is one of the strongest features in the photograph. It extends beyond the front wall, creating a defined area above the glazed doors and decking.
Its underside is lined in timber, continuing the warm exterior finish overhead. The boards remain visible from the garden, making the underside an important part of the appearance rather than a hidden construction detail.
The dark fascia provides a crisp outer edge. It runs across the front and continues around the side, establishing the roofline against the softer shapes of the surrounding trees.
A canopy can offer some overhead shelter close to the entrance, with the level of protection depending on wind direction and weather conditions. It also gives the customer somewhere to pause while opening the doors.
When planning this style, consider the projection alongside the deck. Together, they determine how the entrance sits within the garden and how much space is available immediately outside the room.
Vertical timber cladding gives warmth and texture
The vertical timber cladding introduces varied colour and grain across the exterior. The right-hand elevation shows this particularly clearly, with individual boards ranging from lighter golden tones to deeper warm shades.
That variation gives a broad wall surface interest without needing additional decoration. From a distance, the cladding reads as one material. At close range, the differences between boards become part of the character.
The vertical direction also complements the tall side window and the dark corner trim. Those upright lines contrast with the long horizontal edges of the canopy and decking.
If you are choosing timber for your own building, compare a sample beside the fences, paving and planting that will remain. The amount of shade in an established garden can influence how a finish appears.
We can explain the timber options available and discuss their care requirements. You can compare exterior choices within our Premium Garden Room range.
Dark trims bring the exterior together
Anthracite-coloured detailing appears around the roof, glazing and visible corner. Dark fascia boards also finish the edge of the decking, giving the installation a coordinated outline from top to bottom.
This is particularly effective beside warm timber. The darker elements identify the main shapes of the building, while the cladding provides texture between them.
The corner trim is prominent in the photograph. Its vertical line connects the roof edge with the deck, making the junction between the front and side elevations easy to read.
Using a consistent colour for these details helps a building feel settled within its design. It also allows the timber grain and surrounding greenery to remain visible features.
For a comparable project, look at the frames and trims alongside the main cladding sample. Seeing the combination together makes it easier to judge the finished effect.
Glazed double doors beneath the canopy
The double glazed entrance doors occupy the central part of the front elevation. Their dark frames relate to the roof and corner trims, while the glass reflects the surrounding garden.
With the doors closed, the customer retains a view outside and daylight can enter through the frontage. Opening the pair provides access to the deck and can make it easier to bring furniture into the room.
The canopy gives the doorway a strong frame. Timber surrounds the entrance on both sides and overhead, creating a warm backdrop to the darker glazing assembly.
Furniture planning should begin with a comfortable route through the doors. Allow room inside for arriving with bags, refreshments or equipment, then arrange larger pieces around that route.
If you already have a sofa, cabinet or desk in mind, check its dimensions against the usable opening. Include the approach across the deck and any turning space needed once the item enters the building.
A tall window on the right-hand elevation
The narrow, tall side window adds glazing to the right-hand wall. Its upright proportions echo the vertical timber boards and introduce another view from within the room.
The visible horizontal division gives the window two distinct glazed sections. Its position provides daylight from a different direction from the front doors, which can be useful when arranging a desk or seating.
A chair placed near the side window may enjoy a more intimate view of the surrounding planting. A desk could receive light from the side, depending on its position and the building’s orientation.
The furniture plan should account for any opening section and handle access confirmed in the final specification. Keeping that area convenient to reach helps the window remain useful once the room is furnished.
On a similar design, consider both privacy and outlook when selecting a side-window position. The relationship with nearby fences and planting can influence where glazing works best.
Dark decking across the front and side
The dark wraparound decking creates a continuous surface across the frontage and along the right-hand side. It gives the building a defined base and separates the entrance area from the surrounding ground.
Its colour complements the glazing and roof trims. Against the warm cladding, the deck makes the timber walls stand out while maintaining a consistent palette.
The front section provides space to stand before entering and supports movement around the doorway. The side section continues access along the building and contributes to the view through the tall window.
When designing similar decking, begin with the routes you expect to use. Consider where you will arrive from the house, how the doors move and whether furniture or planters will be placed nearby.
The board surface appears wet in the photograph, which deepens its colour and reflects the cladding. The exact material should be confirmed before describing its maintenance requirements.
Planning the transition onto the deck
A dark step or landing is visible near the front corner of the photograph. It forms part of the approach from the surrounding garden onto the raised decking.
Changes in level should be considered alongside the doorway and the route from the house. The most convenient point of access may be towards one side, depending on existing paths and planting.
Marking out the building and deck together can help you test that approach. Walk towards the proposed entrance while imagining the finished step, door movement and any items you might carry.
The deck fascia also contributes to the appearance from lower ground. Here, its dark finish creates a clear edge beneath the boards and relates to the rest of the exterior detailing.
For your own project, show us the surrounding levels and the route you want to retain. These practical details help establish how the finished entrance should meet the garden.
Exterior lights and an outdoor electrical fitting
Two exterior wall lights sit on the timber frontage, one on either side of the glazed entrance. Their compact fittings add detail during the day and provide lighting around the doorway when switched on.
A weatherproof electrical fitting is visible on the right-hand wall beneath the tall window. Its final function and specification can be confirmed from the project details.
For customers planning outdoor power, the intended use of the deck should guide the position. A convenient connection point can serve suitable equipment while keeping cables away from walking routes.
Lighting should also be considered along the complete approach. A fitting beside the entrance serves the immediate area, while a separate path or change in level may need additional illumination.
Explaining your routine during the design discussion helps establish where fittings and controls will be most useful.
Making a 5m x 3m interior work well
The 5m x 3m external footprint provides an overall area of 15 square metres. The internal usable dimensions will be smaller because of the wall construction.
Its proportions offer scope for a desk, seating and storage, depending on the intended use. Begin with the item or activity that needs the most room, then consider what else can fit comfortably.
For a workspace, allow clearance behind the chair and convenient access to equipment. For a lounge, think about the view from the main seat and the route between the doorway and other furniture.
Glazing on the front and side gives different daylight conditions within the room. A desk positioned at an angle to the glass may help manage screen reflections while retaining an outlook.
Our garden office range provides further ideas if home working is your main priority.
Working around the established garden
The planting gives this installation much of its atmosphere, and it should form part of the planning from the beginning. Access is needed for construction and for looking after both the building and garden afterwards.
Identify any shrubs or trees you particularly want to retain. Their position can influence the footprint, decking and route to the entrance.
Consider future growth too. A plant that sits comfortably beside the room today may extend towards the cladding or deck over time. Leaving workable access makes routine garden care easier.
A site survey allows us to review these relationships alongside ground levels and installation access. Photographs taken from several directions provide a useful starting point before that visit.
Plan your Knaresborough garden room with Oeco
This installation brings together a deep canopy, warm timber cladding, dark detailing and a planted garden setting. Each element contributes to how the room looks and how it can be approached and used.
For local information and further inspiration, explore our Garden Rooms Knaresborough page. We can discuss how similar ideas could work around your available space and preferred outlook.
Oeco is a family-run business established in 2006. You can visit our two indoor showrooms in Ripon to compare materials, walk through finished buildings and discuss your plans.
Call Oeco free on 0800 170 1270 to request a fixed-price quotation or ask about arranging a free site survey.