
5m x 3m Cedar Canopy Corner Garden Room in Scarborough, North Yorkshire
Scarborough, North Yorkshire
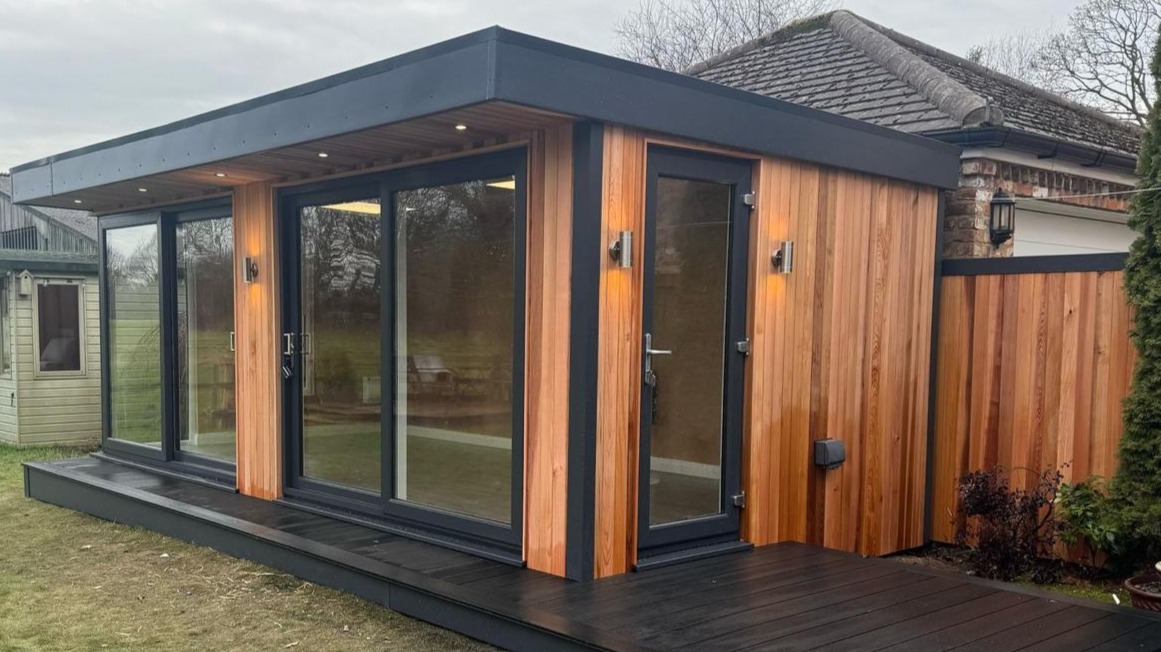
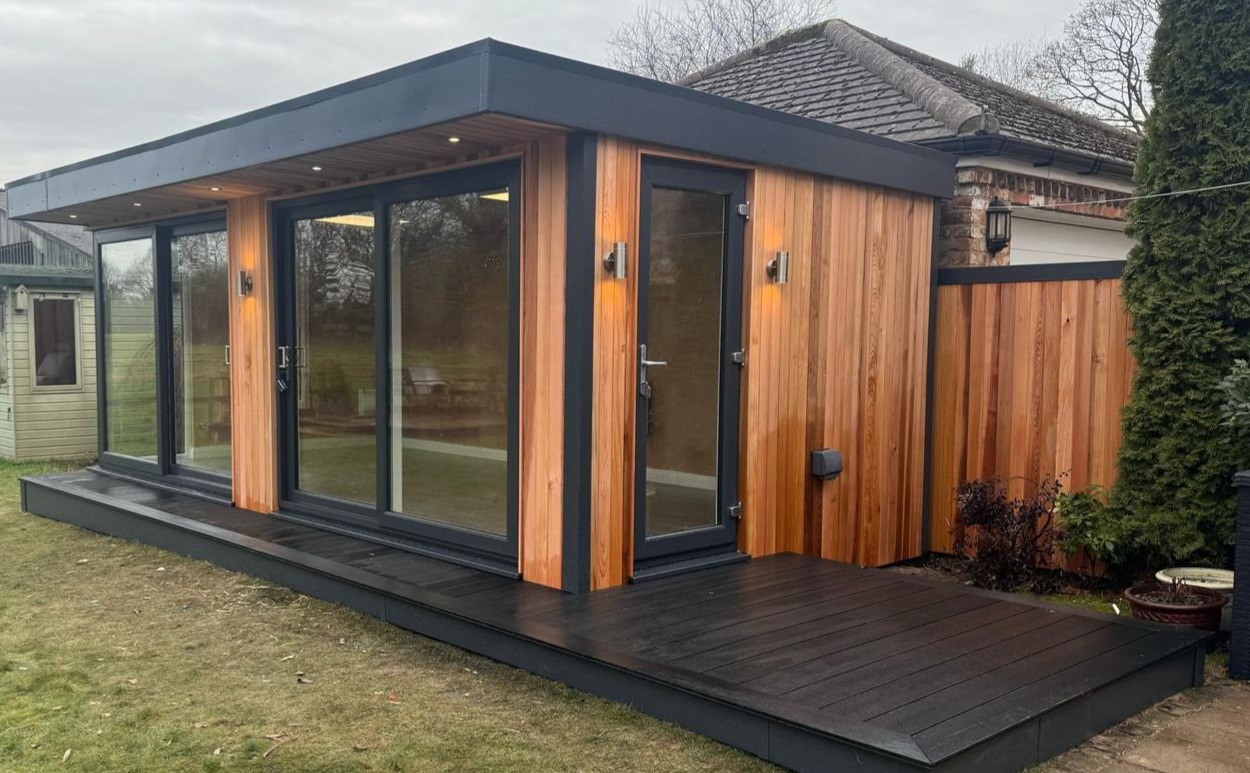
Warm cedar cladding, extensive glazing and an illuminated canopy give this 5m x 3m corner garden room in Scarborough, North Yorkshire, its character. The building sits beside an existing garage, with lawn in front and established planting around the garden. Dark decking runs across the frontage and widens towards the right-hand side, where a separate glazed door provides another entrance.
The Western Red Cedar cladding is fitted vertically, drawing attention to the height of the walls and the natural variation between boards. Anthracite door frames, corner detailing and roof trims give the timber a crisp outline. Beneath the canopy, recessed downlights illuminate the frontage, while wall lights bring out the cedar around the entrances.
This installation brings several practical features into one compact building. A wide sliding entrance faces the lawn, the side door provides another route indoors, and the widened decking creates room to approach from the right. For homeowners exploring garden rooms in Scarborough, it offers inspiration for planning a building around the garden and structures already in place.
A garden room designed around an existing setting
The surrounding garden gives the building a clear position. The garage stands immediately behind and to the right, a smaller garden shed sits to the left, and the lawn opens out in front. The new room occupies its own space between these established features.
That relationship matters because a garden room becomes part of the view from several directions. From the lawn, the broad glazed frontage is the main feature. From the right-hand approach, the side door, widened decking and cedar screening become more prominent.
The building therefore has more than one face to consider. Its entrance arrangement responds to movement around the property, while the cladding and screening help tie the new structure into its surroundings.
When planning a similar project, photograph the proposed location from the house, lawn and any existing path. These viewpoints can reveal which elevation needs the strongest outlook and where a second entrance could be useful.
Vertical Western Red Cedar cladding
The Western Red Cedar exterior introduces warm tones across the front and right-hand elevation. Individual boards vary in colour and grain, giving the walls detail that becomes more noticeable as you approach.
Vertical cladding suits the tall doors and glazed panels. The repeated lines continue across the solid sections, helping the timber areas feel connected even where glazing separates them.
The cedar also changes in appearance under the different lights. In daylight, its grain and colour variation provide the detail. With the exterior fittings switched on, pools of light highlight selected boards and bring warmth to the frontage.
For customers choosing cedar, samples are useful alongside the materials already present in the garden. Brickwork, fencing and paving can all influence how the timber appears. We can discuss how cedar weathers outdoors and the care appropriate to your preferred finish.
You can compare timber and other exterior options within our Premium Garden Room range.
An anthracite outline around the timber
Dark trims frame the roof, doors and corner of this installation. Their consistent colour gives the building a clear outline and allows the cedar to remain the main material across the walls.
The roof fascia is particularly noticeable. It draws a continuous line above the frontage and around the right elevation, defining the building’s shape against the existing garage roof and surrounding trees.
At the corner, the dark vertical detail links the upper fascia with the deck below. The glazing frames repeat the same tone, bringing the openings into the overall colour scheme.
This is a useful approach when a building has several glazed sections. A consistent frame colour helps the doors and panels read as parts of one design, while the timber introduces natural variation between them.
A canopy with recessed downlights
The projecting canopy adds depth above the front elevation. Its timber-lined underside continues the warm finish over the glazed entrance and provides a visible ceiling to the area immediately outside.
A row of recessed downlights runs beneath the canopy. Their placement spreads light along the frontage, drawing attention to the glass, cedar and decking below.
The lighting changes how the room can be appreciated after daylight fades. The canopy remains visible as a feature, and the entrance is easier to identify from across the garden.
The projection also offers some overhead shelter close to the building, depending on wind direction and weather conditions. When planning a similar canopy, consider where you will stand to open the doors and how the route from the house will meet the deck.
The roof and decking should be viewed together. One defines the upper edge of the approach, while the other determines where people walk and pause.
A wide sliding entrance facing the lawn
The main sliding doors face the lawn and provide a broad glazed connection with the garden. When closed, the glass retains the outlook from inside. When opened, the doorway gives access directly onto the front decking.
Sliding operation is useful where the area immediately outside also serves as a walking route. The moving panel travels within the door assembly, leaving the deck free of an outward door swing.
Furniture still needs to leave a comfortable route through the opening. A chair or table placed close to the glazing may have an appealing outlook, but people should be able to enter without navigating around it.
If you plan to bring in larger furniture, check the clear opening alongside the route across the deck. The overall width of a door set differs from the usable passage when it is open.
A separate glazed entrance on the right
The single glazed side door gives this room another point of access. It opens onto the wider section of decking and allows the customer to approach from the right-hand side.
A second entrance can be useful where a building relates to different parts of a property. The front may serve the lawn, while another route connects with a path, patio or area beside the house.
Its value depends on the layout inside as well. Both entrances need clear access once furniture is in place. Planning the routes between them helps establish where larger items, such as desks or cabinets, can sit comfortably.
The side door also adds glazing to the right elevation. This allows daylight to reach the room from another direction and gives the customer an additional view towards the surrounding garden.
Tall glazing and the corner appearance
The tall glazed sections towards the left broaden the building’s connection with the garden. Together with the main entrance and side door, they create a room with several outward-looking positions.
That can be particularly valuable in a five-metre-wide building. Someone seated away from the main doors can still enjoy daylight and a garden view through another section of glass.
The corner arrangement also affects how the room appears while moving around it. Reflections shift across the glazing, and the relationship between the front and side becomes clearer from an angle.
For a similar design, think about the view from seated height. A desk, reading chair or sofa each creates a different viewpoint. Matching the glazing to those positions can help make the finished room more enjoyable to use.
Wraparound decking with a wider side landing
The dark decking extends across the front and around the right-hand side. Its outline gives the building a continuous base, while the larger area near the side door provides a more generous landing.
This change in depth is a practical design detail. The narrow front section serves the main glazed elevation, and the wider section accommodates the side approach and doorway.
The matching dark fascia beneath the boards gives the deck a defined edge against the lawn. From the garden, it ties visually to the roof trims and glazing frames, creating a consistent dark outline around the warmer cedar.
When planning comparable decking, begin with the routes people will follow. Identify where they arrive from, where the doors operate and where any outdoor furniture might sit. Those movements help determine which areas need additional depth.
Cedar screening beside the garage
The matching cedar-clad screening to the right of the room extends the material palette beyond the building itself. It creates a coordinated edge beside the existing garage and helps the new installation feel connected with the surrounding garden layout.
This is an example of using a building finish across a wider project. A matching screen can provide visual continuity where different structures meet, particularly if an older garage or boundary would otherwise dominate the view.
The dark trim above the screen repeats the tone of the garden room’s roofline. The cedar boards beneath continue the vertical pattern used on the main wall.
If you have an adjacent feature you would like to incorporate into the design, show it during the initial discussion. A screen, gate or adjoining timber detail may help bring the overall setting together.
Exterior wall lights and an outdoor electrical point
Three visible exterior wall lights complement the canopy downlights. Their positions highlight the cedar around the front and side entrances, adding another layer of illumination.
The photograph also shows a weatherproof electrical fitting low on the right-hand wall. An outdoor power point can be a useful addition where decking forms part of the room’s everyday setting.
When specifying your own building, explain how you expect to use the outside area. Suitable outdoor lighting or occasional electrical equipment may influence where a socket is most convenient.
Consider the complete route from the house after dark as well. Lights on the building serve the immediate frontage, while a longer path or separate change in level may need its own lighting arrangement.
Planning the interior within a 5m x 3m footprint
The 5m x 3m external dimensions describe a footprint of 15 square metres. The internal usable area will be smaller because the walls occupy part of that measurement.
In a room with extensive glazing and two entrances, circulation should be the starting point for furnishing. Establish comfortable routes from both doors, then place desks, seating and storage around them.
Lower furniture near the glass can preserve the outlook, while taller cabinets may work better against solid wall sections. A desk positioned at an angle to the glazing can receive daylight while allowing the screen position to be adjusted.
If the room will mainly support home working, our garden office range provides further layouts to compare. A clear furniture plan can also help identify where power, lighting and storage will be most useful.
Developing a design for your Scarborough garden
This installation demonstrates how the details of a site can guide a garden room. The lawn-facing frontage, side entrance, extended decking and matching screen each respond to a different part of the setting.
For your own project, start with photographs and approximate measurements. Include the approach from the house, any existing structures and the views you want to enjoy from inside.
A site survey gives us the opportunity to assess levels, access and the proposed footprint. We can then discuss how the glazing, decking and selected finishes could work together around your intended use.
For more local inspiration, explore our Scarborough garden room design and installation service.
You can also visit our two indoor showrooms in Ripon to compare materials and walk through finished buildings. Call Oeco free on 0800 170 1270 to discuss your plans, request a fixed-price quotation or ask about a free site survey.