
5m x 3m Cedar Canopy Garden Room in Bury, Greater Manchester
Bury, Greater Manchester
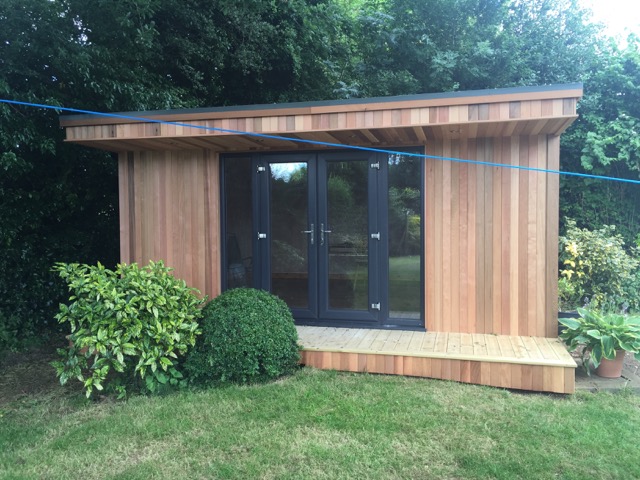
The established planting was an important part of the brief for this 5m x 3m canopy garden room in Bury, Greater Manchester. The customer wanted an additional room in the corner of the garden while keeping the bushes and foliage that already gave the space its character. We worked around that planting during construction, positioning the building so it could sit within the garden the customer wanted to retain.
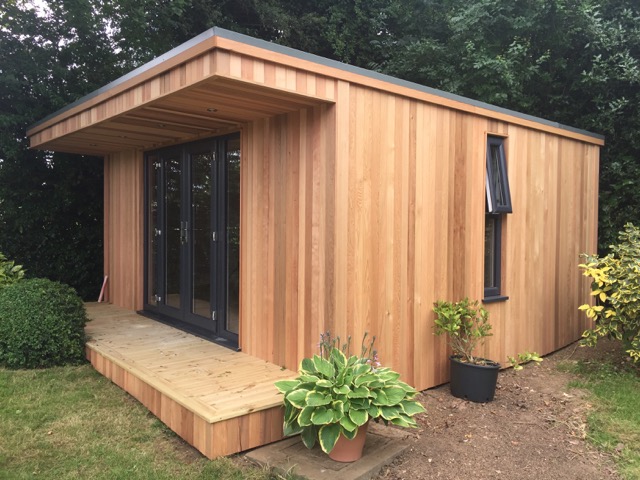
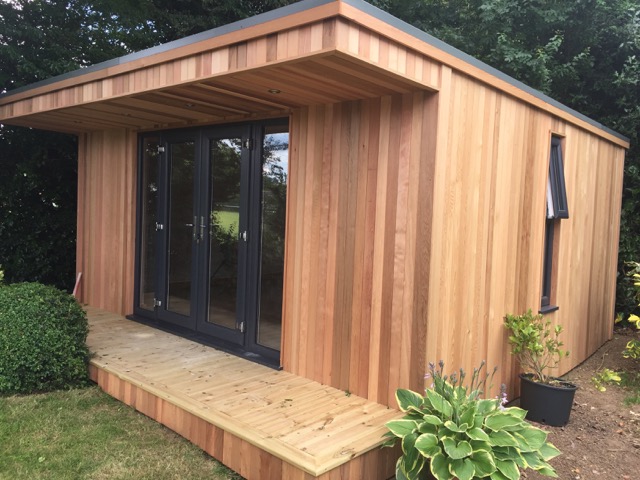
The room is externally clad in Western Red Cedar, with timber decking across the front. Its glazed entrance combines 1.5m double patio doors and two fixed glass side panels. The canopy projects above the frontage, giving the doorway depth and a clear place within the timber exterior.
A rear corner is a popular position with our customers. It can give the room a defined setting while leaving much of the garden open for lawns, borders and outdoor seating. This Bury installation shows how that approach can work in an established garden, with the existing foliage helping to frame the new building. Explore more layouts in our Premium Garden Room range.
Starting with the garden the customer wanted to keep
When a garden has been planted and enjoyed for years, the bushes and borders often matter as much to the owner as the open space between them. They may provide a backdrop to a seating area, soften a boundary or make one part of the garden feel more private. On this project, retaining that established foliage was one of the customer’s priorities.
That requirement helped guide the building position. The garden room needed enough space for its structure, entrance and deck, and the planting needed to remain part of the setting. Looking at those elements together allowed the new room to take its place in the garden without losing the character the customer already valued.
For a similar project, point out the plants you want to keep at the beginning of the discussion. A photograph taken from the house can show how they contribute to the view. Another taken from the proposed room position can reveal how the same planting would look from inside. Those two perspectives help explain which parts of the garden are most important to you.
Why a rear corner is a popular position
Many customers first consider the rear left-hand or right-hand corner when deciding where to put a garden room. It gives the building a place at the edge of the garden and often preserves a useful area of open ground in front. The room can then face back towards the lawn, patio or house, depending on the outlook the customer prefers.
A corner position can also give an underused part of the garden a purpose. An area previously visited mainly for trimming bushes or tending a border may become somewhere to spend time every day. The walk to the room brings that part of the garden into regular use, and the view from inside offers a fresh perspective on the property.
The right corner still depends on the individual site. One side may receive more daylight, while the other may have a more convenient approach. Existing paths, changes in level and planting can all influence the decision. Marking out the proposed footprint and walking towards it from the house is a useful way to compare the options before agreeing the final position.
Working around the established bushes
Construction in a planted garden calls for attention to the space around the building as well as the footprint itself. On the Bury installation, the team worked around the established bushes the customer wanted to retain. That shaped how the room was approached and how the new timber surfaces related to the foliage.
There needs to be room to assemble the building, bring materials to the site and complete the exterior. Once installation is finished, the customer also needs access for looking after the garden and maintaining the room. Considering those requirements early helps establish a position that works through construction and afterwards.
Mature plants also change over time. New growth may extend towards the cladding or over the deck, so it is helpful to leave a workable relationship between the planting and the building. During a site survey, we can look at the available space and discuss access around the elevations. If you have particular bushes or borders you want to preserve, showing us their position gives us a clearer starting point.
Western Red Cedar among the foliage
The Western Red Cedar cladding brings warm timber tones to the exterior. Against established greenery, the variation in the boards gives the building a natural texture. From the house, the cladding reads as a continuous surface framing the glazing. Closer to the room, the individual grain patterns become easier to appreciate.
The canopy adds another layer to that appearance. Timber beneath the roof projection receives light differently from the more exposed areas of the front. The resulting shadow line helps define the entrance and gives the five-metre frontage depth.
Cedar is also a finish to consider over time. Its appearance changes outdoors, and the care needed depends on the finish you choose and the look you want to retain. We can discuss those points alongside the design. Comparing a sample against your existing fencing, paving and planting can help you decide how the timber will sit within the garden at different times of day.
A canopy that gives the entrance definition
The canopy is a clear feature of this garden room. Its projection brings the roofline forward over the entrance, creating a shaded area around the patio doors and side panels. Seen from an angle, the depth of the roof gives the building more dimension than a flat frontage alone.
Below it, the timber decking establishes the approach. The canopy and deck work together to frame the doorway, with the room set behind those two horizontal edges. This gives the customer a recognisable point of arrival as they walk through the garden.
If you like this style, consider how the canopy will look from your usual approach. A route arriving along the side of a border can reveal the projection gradually. From a patio directly in front, the roofline may be seen more clearly as a line across the building. Those views help determine how the room should be oriented and where the doorway will feel most convenient.
Double patio doors with fixed glass side panels
The 1.5m double patio doors provide the main entrance and a glazed view towards the garden. The customer can use one door leaf for an ordinary visit or open both when bringing in furniture. With the doors closed, the glazing keeps the planting and outdoor space visible from inside.
The two fixed glass side panels widen that outlook and bring additional daylight into the room. They give people seated away from the centre of the doorway another view of the garden. A chair placed towards one side may look through the nearest fixed panel, while someone at a desk farther back can still enjoy the glazed frontage.
Furniture planning should take those views into account. Start with the place where you expect to spend most of your time and look out from approximately seated height. That can help you decide where a desk, armchair or worktable belongs. Keep the route through the doors comfortable, allowing room for people to enter while others are already using the room.
Timber decking at the front of the room
The front timber decking gives the building an outdoor threshold and provides somewhere to stand before opening the doors. Its timber surface complements the cedar exterior, making the approach feel connected to the rest of the design.
In an established garden, the point where the deck meets a path or lawn deserves attention. The customer should be able to reach the doors easily while retaining access to nearby planting. A border may shape the approach, and a particular bush may be part of the view you want to preserve.
If you want to add pots or a chair outside a similar room, include them when planning the decking. The doors need space to swing, and people need room to stand and pass. Sketching those movements alongside the furniture helps show how much of the deck should remain clear. It also makes it easier to keep the planting visible without crowding the entrance.
Making the most of the 5m x 3m layout
The 5m x 3m external footprint gives the building an overall area of 15 square metres before the decking is added. The five-metre width offers scope to arrange furniture at either end, with the glazed entrance providing a clear way into the room.
For a leisure space, one end could hold comfortable seating and the other a cabinet or table. A hobby room might use a solid wall for a work surface, keeping materials within reach while leaving the view through the glass open. Someone working from home could set up a desk away from the doorway and use a separate chair for reading or breaks.
Check furniture against the confirmed internal measurements. The walls take up part of the external footprint, and items need clearance when they are being used. A chair pulls back from a desk, drawers open into the room and cupboard doors need space in front. Our garden office range provides further examples if a dedicated workspace is your priority.
Enjoying the garden from a different viewpoint
Placing the room at the rear of the garden changes the direction from which the customer experiences the space. From the house, the room becomes a feature framed by the existing bushes. From indoors, the customer looks back across the garden, with the planting forming part of that outlook.
That reversal can make familiar features feel different. A border usually seen from a kitchen window may become the foreground to the view from a chair. The house and patio may also appear together in a way the customer rarely noticed before.
When planning your own room, spend time at the proposed position before choosing the final orientation. Notice what is visible between the plants and where the strongest light reaches the ground. A small adjustment in angle can sometimes improve the view or give the entrance a more natural connection with the route from the house.
Planning installation in an established garden
Photographs and approximate measurements are a useful starting point. Show the proposed corner, the route from the house and the planting you want to keep. Include gates, paths and any narrow sections that affect how materials will reach the site.
Our site survey gives us the opportunity to assess the position directly. We can discuss the room dimensions, canopy, decking and the access needed around the building. It is also a chance to explain how you use the garden now and what you would like the new room to add.
The agreed quotation sets out the project specification, including delivery and professional on-site installation. If retaining particular plants is central to your plans, make that clear during the design discussion so it can be considered alongside the footprint and construction arrangements.
Garden rooms in Bury and Greater Manchester
We design and install garden rooms in Bury and across Greater Manchester. This project offers a useful reference if you want a cedar-clad room in a rear corner while keeping the established garden around it.
You can visit our two indoor showrooms in Ripon to compare finishes and see different layouts at full scale. Bring photographs of your garden and tell us which plants, paths and views matter most to you.
If this 5m x 3m Western Red Cedar canopy garden room in Bury has inspired your plans, explore our Premium Garden Rooms or call Oeco free on 0800 170 1270 to discuss your project, request a fixed-price quotation or ask about a free site survey.